本文最后更新于:2023年3月19日 晚上
本文转自:https://juejin.im/post/6844903674183942152#heading-8、https://juejin.im/post/6844903957593063432
请求头:**origin、referer、content-type、user-agent、expires、If-None-Match、If-Modified-Since**
响应头:**cache-control、access-control-allow-origin、etag、last-modified**
http 请求头与响应头的应用
当我们随便打开一个网址(比如大家经常拿来测试网络的百度)时,打开Network,会看到如下请求头,响应头:
 究竟这些 headers 都有什么用呢? 咱们挨个探个究竟。
2.1 Content-Type
Content-Type表示请求头或响应头的内容类型。作为请求头时,利用它可以进行body-parser。 Sooo~ What is body-parser?
body-parser 是 node 常用的中间件,其作用是:
Parse incoming request bodies in a middleware before your handlers, available under the req.body property.
即在处理数据之前用中间件对 post 请求体进行解析。 body-parser的例子为:
下面的例子展示了如何给路由添加body parser。通常,这是在express中最为推荐的使用body-parser的方法。
1
2
3
4
5
6
7
8
9
10
11
12
13
14
15
16
17
18
| var express = require("express");
var bodyParser = require("body-parser");
var app = express();
var jsonParser = bodyParser.json();
var urlencodedParser = bodyParser.urlencoded({ extended: false });
app.post("/login", urlencodedParser, function (req, res) {
if (!req.body) return res.sendStatus(400);
res.send("welcome, " + req.body.username);
});
app.post("/api/users", jsonParser, function (req, res) {
if (!req.body) return res.sendStatus(400);
});
复制代码;
|
body-parser核心源码为:
1
2
3
4
5
6
7
8
9
10
11
12
13
14
15
|
switch (parserName) {
case "json":
parser = require("./lib/types/json");
break;
case "raw":
parser = require("./lib/types/raw");
break;
case "text":
parser = require("./lib/types/text");
break;
case "urlencoded":
parser = require("./lib/types/urlencoded");
break;
}
|
以json为例:
1
2
3
4
5
6
7
8
9
10
11
12
13
14
15
16
17
18
19
20
21
22
23
24
25
26
27
28
| var contentType = require("content-type");
function getCharset(req) {
try {
return (contentType.parse(req).parameters.charset || "").toLowerCase();
} catch (e) {
return undefined;
}
}
var charset = getCharset(req) || "utf-8";
if (charset.substr(0, 4) !== "utf-") {
debug("invalid charset");
next(
createError(415, 'unsupported charset "' + charset.toUpperCase() + '"', {
charset: charset,
type: "charset.unsupported",
})
);
return;
}
|
可以看出:其背后工作原理就是通过分析请求头中的Content-Type的类型,根据不同的类型进行相应数据处理,我们自己模拟一下:
step1: 先建立server.js:
1
2
3
4
5
6
7
8
9
10
11
12
13
14
| req.on("end", function (params) {
let r = Buffer.concat(arr).toString();
if (req.headers["content-type"] === www.js) {
let querystring = require("querystring");
r = querystring.parse(r);
console.log(r, 1);
} else if (req.headers["content-type"] === "application/json") {
console.log(JSON.parse(r), 2);
} else {
console.log(r, 3);
}
res.end("end");
});
|
step2: 客户端模拟请求:
1
2
3
4
5
6
7
8
9
10
11
12
13
14
15
16
17
18
| let opts = {
host: "localhost",
port: 3000,
path: "/hello",
headers: {
a: 1,
"Content-Type": "application/json",
"Content-Length": 7,
},
};
let http = require("http");
let client = http.request(opts, function (res) {
res.on("data", function (data) {
console.log(data.toString());
});
});
client.end('{"a":1}');
复制代码;
|
step3: 测试。 先启动 server,再启动 client,服务端收到按照application/json格式解析的数据: { a: 1 } 2. Content-Type与body-parser之间的关系就先分析到这里了。 后面我们接着看请求头。
application/x-www-form-urlencodedmultipart/form-datatext/plain
分别说一下,这三种类型的使用:
application/x-www-form-urlencoded
用于普通字段的表单数据,表单数据会在请求体中,数据以符合某种格式(就是 application/x-www-form-urlencoded 这个格式啦,这真不是废话)发送给服务端,至于这个具体是什么样的格式,看 MDN 就可以知道了,总之,这个不是重点,因为就是一种格式而已。
用于文件或二进制数据,数据会按照某种格式(就是 multipart/form-data 这种格式啦,这真不是废话),你想知道这种格式具体是什么样的就看 MDN,因为这并不是重点,就是一种格式而已。
永远不要使用这个值,因为不会被可靠的去解析。**
2.2 Range:bytes
请求头通过 Range:bytes 可以请求资源的某一部分。利用这个字段可模拟部分读取。如下:
1
2
3
| http.createServer(function (req, res) {
let range = req.headers['range'];
})
|
server:
1
2
3
4
5
6
7
8
9
10
11
12
13
14
15
16
17
18
19
20
21
22
23
| let http = require("http");
let fs = require("fs");
let path = require("path");
let size = fs.statSync(path.join(__dirname, "my.txt")).size;
let server = http.createServer(function (req, res) {
let range = req.headers["range"];
if (range) {
let [, start, end] = range.match(/(\d*)-(\d*)/);
start = start ? Number(start) : 0;
end = end ? Number(end) : size - 1;
res.setHeader("Content-Range", `bytes ${start}-${end}/${size - 1}`);
fs.createReadStream(path.join(__dirname, "my.txt"), { start, end }).pipe(
res
);
} else {
fs.createReadStream(path.join(__dirname, "my.txt")).pipe(res);
}
});
server.listen(3000);
|
client:
1
2
3
4
5
6
7
8
9
10
11
12
13
14
15
16
17
18
19
20
21
22
23
24
25
26
27
| let opts = {
host: "localhost",
port: 3000,
headers: {},
};
let http = require("http");
let start = 0;
let fs = require("fs");
function download() {
opts.headers.Range = `bytes=${start}-${start + 3}`;
start += 4;
console.log(`start is ${start}`);
let client = http.request(opts, function (res) {
let total = res.headers["content-range"].split("/")[1];
res.on("data", function (data) {
fs.appendFileSync("./download1.txt", data);
});
res.on("end", function () {
setTimeout(() => {
if (!pause && start < total) download();
}, 1000);
});
});
client.end();
}
download();
|
分段读取添加暂停功能,监听用户输入
1
2
3
4
5
6
7
8
9
| let pause = false;
process.stdin.on("data", function (data) {
if (data.toString().includes("p")) {
pause = true;
} else {
pause = false;
download();
}
});
|
测试结果:
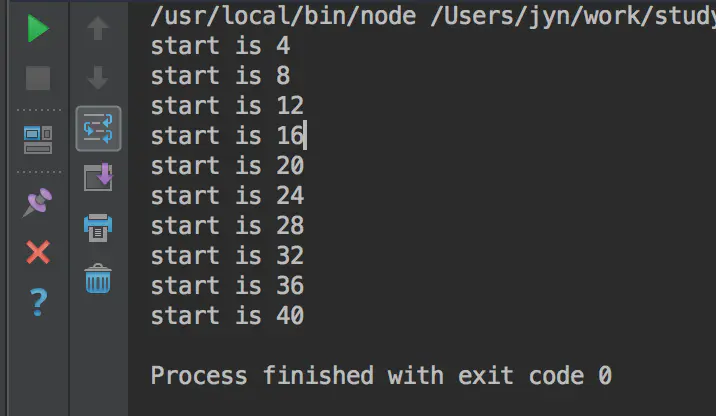
分段读取有以下好处:
模拟并行下载:
1
2
3
4
5
6
7
8
9
10
11
12
13
14
15
16
17
18
19
20
21
22
23
24
25
26
27
28
29
30
31
32
33
34
35
36
37
38
39
40
41
42
| let halfFlag = 20
function download() {
opts.headers.Range = `bytes=${start}-${start+3}`;
start+=4;
console.log(`start is ${start}`)
let client = http.request(opts,function (res) {
let total = res.headers['content-range'].split('/')[1];
let halfFlag = Math.floor(total/2)
res.on('data',function (data) {
fs.appendFileSync('./download1.txt',data);
});
res.on('end',function () {
setTimeout(() => {
if ((!pause)&&(start < halfFlag))
download();
}, 1000);
})
});
client.end();
}
let half = halfFlag
function downloadTwo() {
opts.headers.Range = `bytes=${half}-${half+3}`;
half+=4;
console.log(`half is ${half}`)
let client = http.request(opts,function (res) {
let total = res.headers['content-range'].split('/')[1];
res.on('data',function (data) {
fs.appendFileSync('./download2.txt',data);
});
res.on('end',function () {
setTimeout(() => {
if (!pause&½ < total)
downloadTwo();
}, 1000);
})
});
client.end();
}
download();
downloadTwo();
|
运行结果,会把原文件分成两部分下载到 download1.txt 和 download2.txt。 测试:
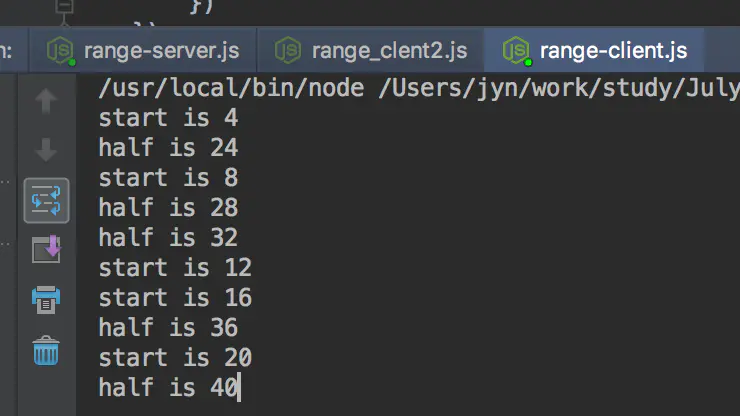
理论上,这样的下载方式会比第一种方法节约一半的时间。但是实际中的文件下载怎样实现加速以及并行下载的,还有待考究。
2.3 Cache-Control 与 Expires 之强制缓存
Response Header 响应头中Cache-Control: max-age=1233可以设置相对当前的时间的强制缓存,与它相关的 Expires可以设置某个绝对时间点限定读取缓存的时间。 模拟实现:
1
2
3
4
5
6
7
8
9
10
11
12
13
14
15
16
17
18
19
20
21
22
23
24
25
26
27
28
| let url = require("url");
let server = http
.createServer(async function (req, res) {
console.log(req.url);
let { pathname, query } = url.parse(req.url, true);
let readPath = path.join(__dirname, "public", pathname);
try {
let statObj = await stat(readPath);
res.setHeader("Cache-Control", "max-age=10");
res.setHeader("Expires", new Date(Date.now() + 10 * 1000).toGMTString());
if (statObj.isDirectory()) {
let p = path.join(readPath, "index.html");
await stat(p);
fs.createReadStream(p).pipe(res);
} else {
fs.createReadStream(readPath).pipe(res);
}
} catch (e) {
res.statusCode = 404;
res.end(`Not found`);
}
})
.listen(3000);
|
测试:
 10s 内刷新:
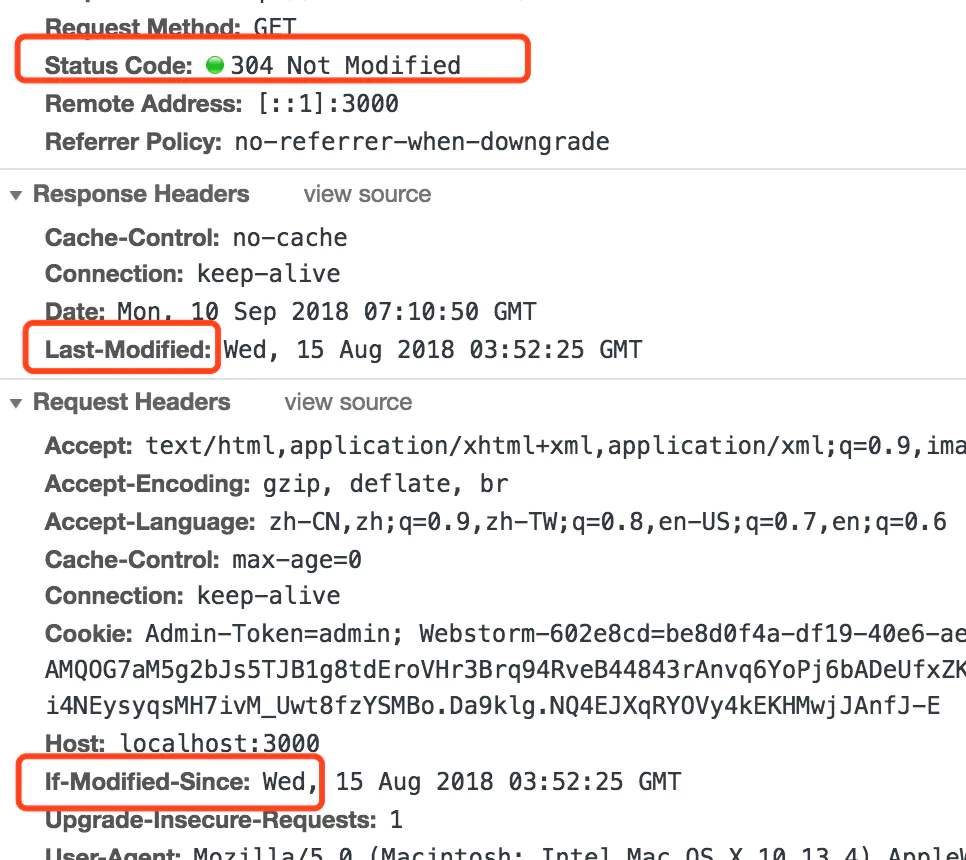
2.4 对比缓存之 Last-Modified 和 If-Modified-Since
对比响应头 Last-Modified and 与请求头 If-Modified-Since,可以通过文件修改时间看文件是否修改,从而决定是重新请求还是走缓存。 模拟如下: step1 不设置强制缓存
1
| res.setHeader("Cache-Control", "no-cache");
|
step2 应用文件修改时间比对是否修改,
1
2
3
4
5
6
7
| res.setHeader("Last-Modified", statObj.ctime.toGMTString());
if (req.headers["if-modified-since"] === statObj.ctime.toGMTString()) {
res.statusCode = 304;
res.end();
return;
}
fs.createReadStream(readPath).pipe(res);
|
测试:
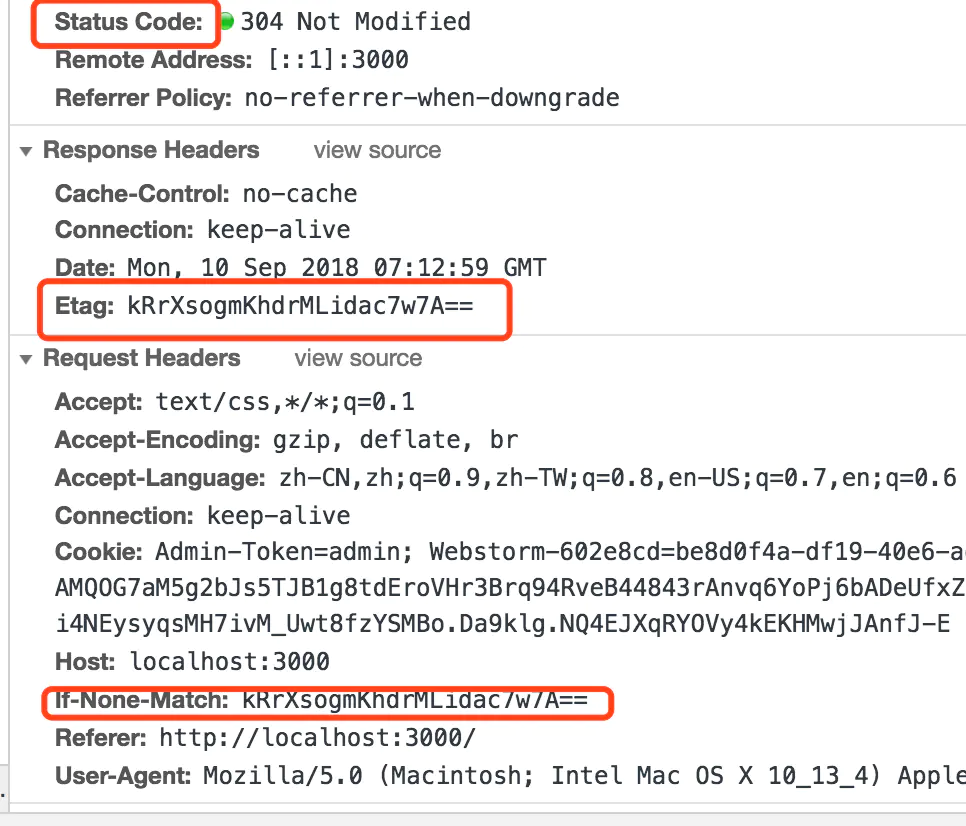
2.5 对比缓存之 Etag 和 If-None-Match
对比响应头:Etag 与请求头:If-None-Match,Etag 和 If-None-Match 如果相等,即返回 304。 etag 如何添加?
根据文件内容,生成一个 md5 的摘要,给实体加一个标签。
这种方法虽然比较耗性能,但是能够更加精确的对比出文件是否进行了修改。依靠文件修改时间进行对比并不够准确。因为有时文件有改动 Last-Modified 发生了变化,但是文件的内容可能根本没有变化。所以这种方案要优于 2.4.
实现方法:
1
2
3
4
5
6
7
| let rs = fs.createReadStream(p);
let md5 = crypto.createHash("md5");
let arr = [];
rs.on("data", function (data) {
md5.update(data);
arr.push(data);
});
|
设置 Etag
1
2
3
4
5
6
7
8
9
10
| rs.on("end", function () {
let r = md5.digest("base64");
res.setHeader("Etag", r);
if (req.headers["if-none-match"] === r) {
res.statusCode = 304;
res.end();
return;
}
res.end(Buffer.concat(arr));
});
|
测试:
2.6 Accept-Encoding
依靠请求头: Accept-Encoding: gzip, deflate, br 告诉服务端可接受的数据格式。服务端返回后会把数据格式通过响应格式通过 Content-Encoding 来标记。 在客户端接受 gzip 的格式下,后端可通过文件压缩处理传递,提高性能。 node api 中提供了zlib模块:
zlib 模块提供通过 Gzip 和 Deflate/Inflate 实现的压缩功能
下面我们来应用 zlib 与请求头 Accept-Encoding 来实现压缩功能。
1
2
3
4
5
6
7
8
9
10
| let zlib = require("zlib");
let fs = require("fs");
let path = require("path");
function gzip(filePath) {
let transform = zlib.createGzip();
fs.createReadStream(filePath)
.pipe(transform)
.pipe(fs.createWriteStream(filePath + ".gz"));
}
gzip("2.txt");
|
解压:
1
2
3
4
5
6
| function gunzip(filePath) {
let transform = zlib.createGunzip();
fs.createReadStream(filePath)
.pipe(transform)
.pipe(fs.createWriteStream(path.basename(filePath, ".gz")));
}
|
path.basename(filePath,'.gz')用来去掉 filePath 文件名的后缀.gz。
根据请求头接受的类型后端的具体操作 :
1
2
3
4
| if (req.url === "/download") {
res.setHeader("Content-Disposition", "attachment");
return fs.createReadStream(path.join(__dirname, "1.html")).pipe(res);
}
|
1
2
3
4
5
6
7
8
9
10
11
12
13
14
15
16
17
18
19
20
21
22
23
24
25
26
27
28
29
30
| let http = require("http");
let fs = require("fs");
let path = require("path");
let zlib = require("zlib");
http
.createServer(function (req, res) {
if (req.url === "/download") {
  res.setHeader("Content-Disposition", "attachment");
  return fs.createReadStream(path.join(__dirname, "1.html")).pipe(res);
}
let rule = req.headers["accept-encoding"];
if (rule) {
if (rule.match(/\bgzip\b/)) {
res.setHeader("Content-Encoding", "gzip");
fs.createReadStream(path.join(__dirname, "1.html"))
.pipe(zlib.createGzip())
.pipe(res);
} else if (rule.match(/\bdeflate\b/)) {
res.setHeader("Content-Encoding", "deflate");
fs.createReadStream(path.join(__dirname, "1.html"))
.pipe(zlib.createDeflate())
.pipe(res);
} else {
fs.createReadStream(path.join(__dirname, "1.html")).pipe(res);
}
} else {
fs.createReadStream(path.join(__dirname, "1.html")).pipe(res);
}
})
.listen(3000);
|
test deflate:
1
2
3
4
5
6
7
8
9
10
11
12
13
14
15
16
| curl -v --header "Accept-Encoding:deflate" http:
* Rebuilt URL to: http:
* Trying 127.0.0.1...
* TCP_NODELAY set
* Connected to localhost (127.0.0.1) port 3000 (#0)
> GET / HTTP/1.1
> Host: localhost:3000
> User-Agent: curl/7.54.0
> Accept: *
|
test others:
1
2
3
4
5
6
7
8
9
10
11
12
13
14
15
16
17
18
19
20
21
22
23
24
25
26
27
28
29
| curl -v --header "Accept-Encoding:nn" http:
* Rebuilt URL to: http:
* Trying 127.0.0.1...
* TCP_NODELAY set
* Connected to localhost (127.0.0.1) port 3000 (#0)
> GET / HTTP/1.1
> Host: localhost:3000
> User-Agent: curl/7.54.0
> Accept: *
|
2.7 referer

referer 表示请求文件的网址,请求时会携带。为了防止自己网站的文件被外网直接引用,可以通过比较 referer,即请求的地址,与本地地址比较,设置防盗链。
1
2
3
4
5
6
7
8
9
10
11
12
13
14
15
16
17
18
19
20
21
22
23
24
25
26
27
28
29
30
| let http = require("http");
let fs = require("fs");
let url = require("url");
let path = require("path");
let server = http
.createServer(function (req, res) {
let { pathname } = url.parse(req.url);
let realPath = path.join(__dirname, pathname);
fs.stat(realPath, function (err, statObj) {
if (err) {
res.statusCode = 404;
res.end();
} else {
let referer = req.headers["referer"] || req.headers["referred"];
if (referer) {
let current = req.headers["host"];
referer = url.parse(referer).host;
if (current === referer) {
fs.createReadStream(realPath).pipe(res);
} else {
fs.createReadStream(path.join(__dirname, "images/2.jpg")).pipe(res);
}
} else {
fs.createReadStream(realPath).pipe(res);
}
}
});
})
.listen(3000);
|
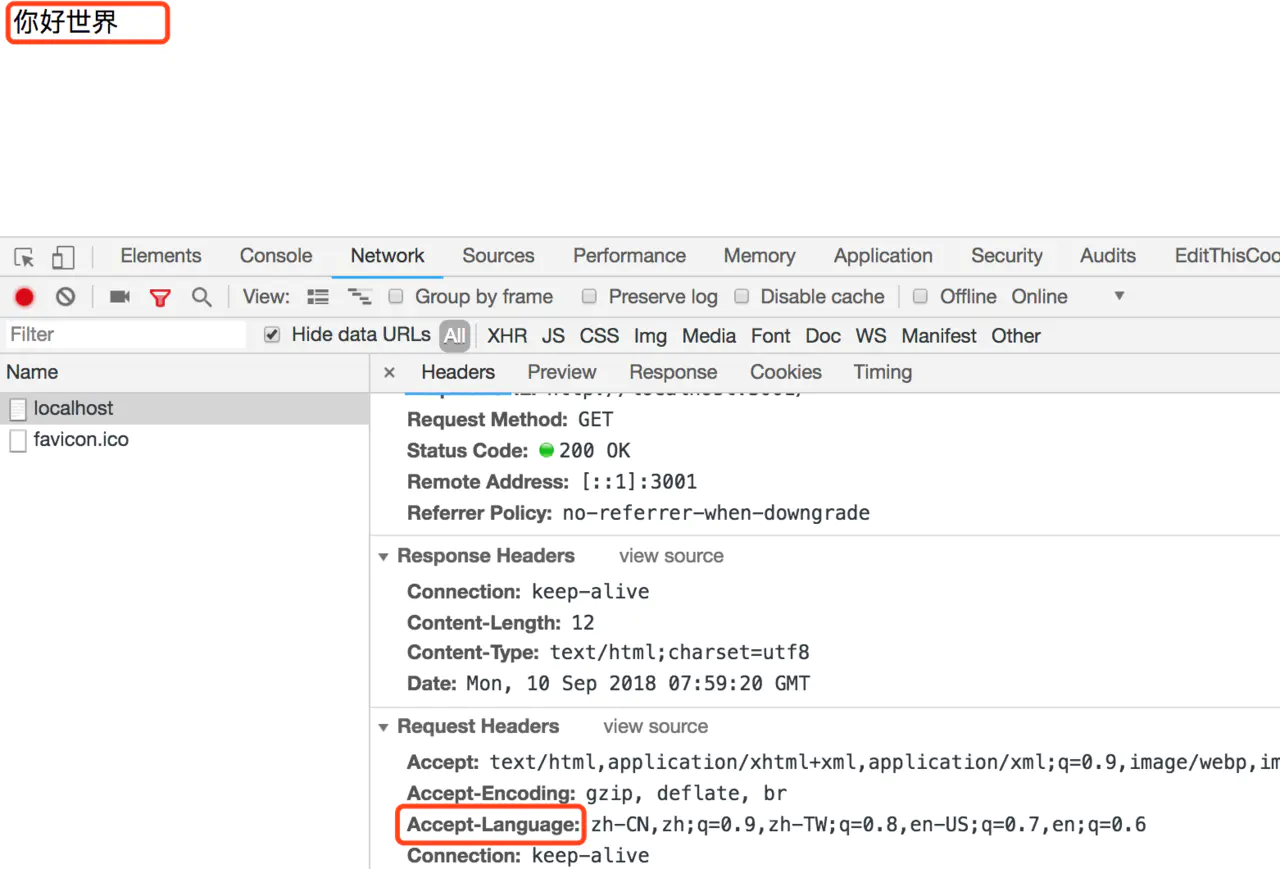
2.8 Accept-Language
请求头:Accept-Language: zh-CN,zh;q=0.9 多个语言用 ‘,’ 分隔,权重用 ‘=’ 表示’,没有默认权重为 1
后端根据请求接受语言的权重一次查找,查找到就返回,找不到就用默认语言
1
2
3
4
5
6
7
8
9
10
11
12
13
14
15
16
17
18
19
20
21
22
23
24
25
26
27
28
29
30
31
32
33
34
35
36
37
38
| let langs = {
en: "hello world",
"zh-CN": "你好世界",
zh: "你好",
ja: "こんにちは、世界",
};
let defualtLanguage = "en";
let http = require("http");
http
.createServer(function (req, res) {
let lan = req.headers["accept-language"];
if (lan) {
lan = lan.split(",");
lan = lan
.map((l) => {
let [name, q] = l.split(";");
q = q ? Number(q.split("=")[1]) : 1;
return { name, q };
})
.sort((a, b) => b.q - a.q);
for (let i = 0; i < lan.length; i++) {
let name = lan[i].name;
if (langs[name]) {
res.end(langs[name]);
return;
}
}
res.end(langs[defualtLanguage]);
} else {
res.end(langs[defualtLanguage]);
}
})
.listen(3000);
|
测试:
总结
请求头与响应头在前后端联调时会经常使用。了解了他们的妙用前后端配合会更加和谐顺畅~
Author: Yanni Jia
Nickname: 非常兔
Email: 385067638@qq.com